For my most recent foray into cake decorating, I was challenged to make a cake for one of my co-workers whose favorite animal is an anteater. I considered making a cake with a fondant anteater on top, but decided to up the ante and make a cake that was actually shaped like an anteater. This was my first cake that was not cake-shaped.
I practiced a few techniques the week before the party and ended up with what appeared to be a seamonster on the counter. I diagrammed how to make two 8-inch rounds into a body, tail, head and neck so I could replicate the proportions. I also baked the cake differently so it would be dense and easier to work with, like sponge cake.
The body piece below is comprised of one 8-inch round cut in half and glued together with icing. I also thinly covered it in chocolate icing.
For the tail piece, I cut out most of the edge of the second 8-inch round in two pieces and stacked them.
The head and neck are wedge-shapes cut from the remainder of the 8-inch round I used for the tail pieces. The proportions here are a little off because of the size of tray I needed to fit the anteater onto. I think the head should actually stretch out more to the left.
I used semi-circles from the second 8-inch cake for legs and covered him in fondant except for the tail. When I covered the head I created an extension for the nose that is all fondant with no cake underneath and tried to smooth out the seam. Then I made facial features from black fondant. I think my favorite part of this cake is the adorable ears!
I put a stripe down the anteater's back with a strip of black fondant and then I added fur (after much experimentation attempting to approximate the color gray) using a decorating tip intended for making grass. If I were more ambitious, I could have covered the whole body, but I decided to be more of a minimalist because the coloring in the icing gave it a funny taste (also it would have taken forever).
With the addition of tiny ants and a red tongue (all fondant), he was starting to at least marginally resemble a giant anteater, which was about all I could hope for, since it was my first "shaped" cake.
Hopefully I'll have a reason to continue expanding my repertoire of decorating techniques with more cakes that are this fun!
A smattering of thoughts for animal-lovers, Seattleites, word nerds, Celiacs, travelers, and probably your mom.
Showing posts with label food. Show all posts
Friday, December 7, 2012
Sunday, November 25, 2012
Beach Cupcakes
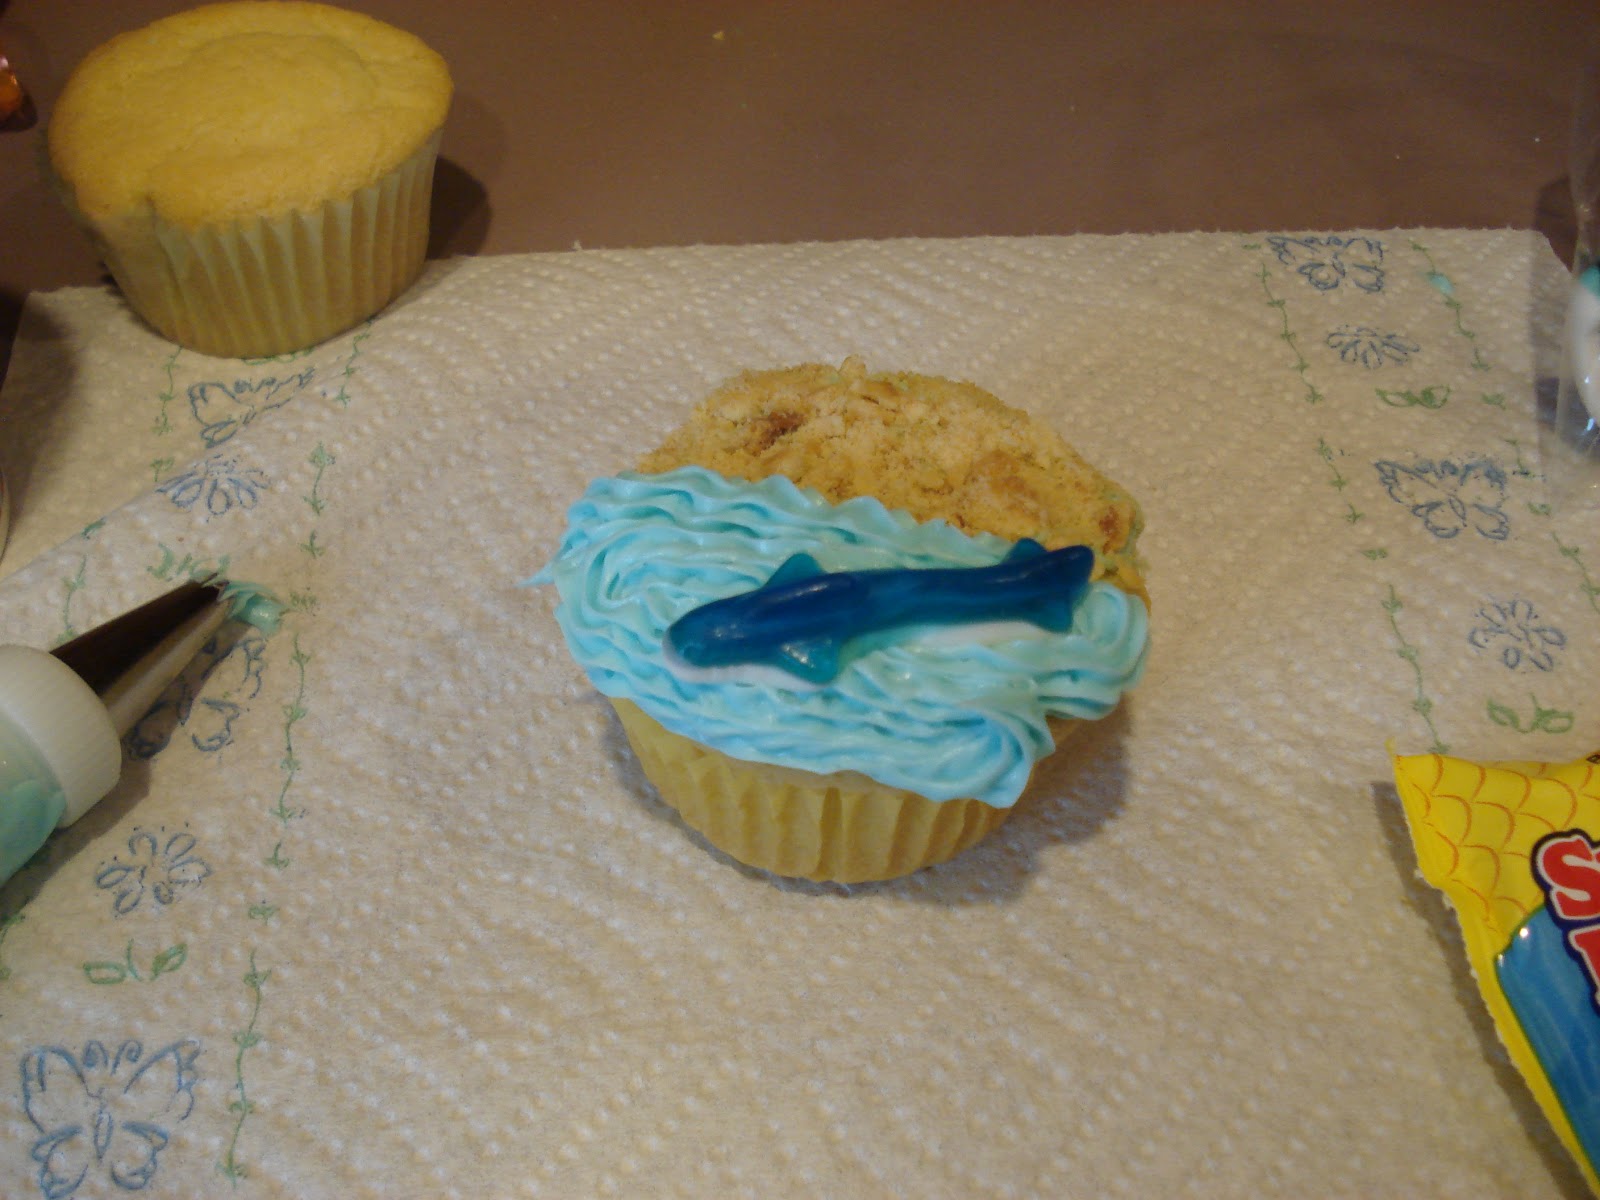
I haven't had much time to do any elaborate cake projects lately, but for my mom's birthday earlier this month, I did manage to throw together some cute beach cupcakes. There are similar cupcakes all over the internet so I had no shortage of photos for inspiration.
Making this batch of cute cupcakes was actually pretty simple. First I baked some gluten-free cupcakes and gathered my supplies.
I used a gluten-free cake mix to bake the cupcakes and went the easy route with the icing and just bought some Pilsbury blue frosting instead of coloring it myself. I put a little smear of the icing on half of the cupcake and then rolled it in smashed up gluten-free animal cookies.
After the "sand" was glued on, I added the ocean part of the cupcake using a closed star icing tip to make swirls. Gummy sharks and Swedish fish served for tasty sea life. Cocktail umbrellas gave these cupcakes the finishing touch.
Making this batch of cute cupcakes was actually pretty simple. First I baked some gluten-free cupcakes and gathered my supplies.
I used a gluten-free cake mix to bake the cupcakes and went the easy route with the icing and just bought some Pilsbury blue frosting instead of coloring it myself. I put a little smear of the icing on half of the cupcake and then rolled it in smashed up gluten-free animal cookies.
After the "sand" was glued on, I added the ocean part of the cupcake using a closed star icing tip to make swirls. Gummy sharks and Swedish fish served for tasty sea life. Cocktail umbrellas gave these cupcakes the finishing touch.
Monday, March 5, 2012
Totem Cake and Teapot Cake
It's been a while since I've posted a cake blog, so here's one for my decorator fans!
Last year I made a cake with a chocolate topper made to look like a salmon in the style of Native American art, which was one of my first cake attempts.
I thought it turned out pretty good, especially considering melting chocolate is not the easiest artistic medium to work with. For his birthday a few weeks ago, I made another cake in Native art style, this time modeled after one of his favorite Ellen Neel totems.
I used green icing on a round cake to represent the earth, which is the middle part of the totem. Then I used melting chocolate again to recreate the "wild woman" character on the bottom of the pole and the eagle on the top. I must say, they were trickier than the salmon.
I also had an issue with this cake because it came out very crumbly and when I tried to apply the icing, bits of cake ripped out and got into the frosting. As a perfectionist of sorts, I was about ready to give up on the project, but decided that with cake decorating, at least mistakes are edible! So I took it to the party anyway and it tasted great. I'm still searching for the magic technique to make the icing smooth like the pros. No matter how many Youtube tutorials I watch, I can't seem to get it right.
The next cake I made was for my aunt, who is a Leap Day baby. She turned 16 this year! She loves tea, so I experimented with fondant modeling and brush embroidery for the first time. I covered a round cake in fondant draped to look like a tablecloth and brush embroidered the flowers onto it.
Far from perfect, but it was reminiscent of a tablecloth, so I was satisfied. Plus, I really liked painting all the flowers on. When the tablecloth was finished, I wanted to find other things to frost so I could practice my new brush embroidering technique!
To place on top of the "table," I needed to fashion a little tea set from fondant, which I bought in a little box that contained 4 colors. This helped make the fondant more affordable, since I didn't need a lot of each color. I used pink to make a teapot, blue for mugs and spoons and yellow for plates and napkins.
For the finishing touches, I placed chocolate chips upside-down in each mug to be the "tea," and I painted one more flower onto the teapot.
Ta-da!
This was such a fun cake and I think the partiers at my aunt's birthday really appreciated it! I only wish the lighting in the photos was better so the colors of the icing and fondant showed up in its fully glory. Brush embroidery and fondant modeling are definitely techniques I am going to be employing in the future!
Last year I made a cake with a chocolate topper made to look like a salmon in the style of Native American art, which was one of my first cake attempts.
I thought it turned out pretty good, especially considering melting chocolate is not the easiest artistic medium to work with. For his birthday a few weeks ago, I made another cake in Native art style, this time modeled after one of his favorite Ellen Neel totems.
I used green icing on a round cake to represent the earth, which is the middle part of the totem. Then I used melting chocolate again to recreate the "wild woman" character on the bottom of the pole and the eagle on the top. I must say, they were trickier than the salmon.
I also had an issue with this cake because it came out very crumbly and when I tried to apply the icing, bits of cake ripped out and got into the frosting. As a perfectionist of sorts, I was about ready to give up on the project, but decided that with cake decorating, at least mistakes are edible! So I took it to the party anyway and it tasted great. I'm still searching for the magic technique to make the icing smooth like the pros. No matter how many Youtube tutorials I watch, I can't seem to get it right.
The next cake I made was for my aunt, who is a Leap Day baby. She turned 16 this year! She loves tea, so I experimented with fondant modeling and brush embroidery for the first time. I covered a round cake in fondant draped to look like a tablecloth and brush embroidered the flowers onto it.
Far from perfect, but it was reminiscent of a tablecloth, so I was satisfied. Plus, I really liked painting all the flowers on. When the tablecloth was finished, I wanted to find other things to frost so I could practice my new brush embroidering technique!
To place on top of the "table," I needed to fashion a little tea set from fondant, which I bought in a little box that contained 4 colors. This helped make the fondant more affordable, since I didn't need a lot of each color. I used pink to make a teapot, blue for mugs and spoons and yellow for plates and napkins.
For the finishing touches, I placed chocolate chips upside-down in each mug to be the "tea," and I painted one more flower onto the teapot.
Ta-da!
This was such a fun cake and I think the partiers at my aunt's birthday really appreciated it! I only wish the lighting in the photos was better so the colors of the icing and fondant showed up in its fully glory. Brush embroidery and fondant modeling are definitely techniques I am going to be employing in the future!
Monday, January 23, 2012
German Chocolate Cupcakes and Coconut Pecan Frosting
This weekend I experimented with a new type of icing for my friend's birthday party. To celebrate his German heritage, he and his friends hosted a German potluck and they asked me to bring some German chocolate cupcakes. (I learned during the making of said cake that German chocolate cake is, in fact, not at all German, but made it anyway.)
First I made the German-themed chocolate cupcake toppers. I thought German flags, pretzels and glasses of beer would be appropriate symbols of the country.
Remember that with a chocolate transfer, you have to do everything backwards from how you'd like it to appear on the cake. In this case, "Tom" appears correct because the letters "T" "O" and "M" happen to look the same forward and backward.
I couldn't taste the cupcakes themselves, since they weren't gluten-free, but they looked moist and fluffy and I placed a pecan on top of each one.
While they cooled, I prepared the icing combining a couple of different recipes. It seems that coconut pecan frosting is very easy to adapt to anyone's preferences and the amounts do not have to be exact. I used recipes from Barbara Bakes and The Joy of Baking.
It was simple to make and adjust. If you like coconut, add more. If you like pecans, add more. If you like butter, add more. Simple. I would suggest that if you are making cupcakes instead of a full German chocolate cake, that you chop the pecans a little smaller than the recipes recommend.
When the icing was cool, I spread it on.
And then added the German-themed chocolate toppers.
Happy birthday, Tom!
First I made the German-themed chocolate cupcake toppers. I thought German flags, pretzels and glasses of beer would be appropriate symbols of the country.
Remember that with a chocolate transfer, you have to do everything backwards from how you'd like it to appear on the cake. In this case, "Tom" appears correct because the letters "T" "O" and "M" happen to look the same forward and backward.
I couldn't taste the cupcakes themselves, since they weren't gluten-free, but they looked moist and fluffy and I placed a pecan on top of each one.
While they cooled, I prepared the icing combining a couple of different recipes. It seems that coconut pecan frosting is very easy to adapt to anyone's preferences and the amounts do not have to be exact. I used recipes from Barbara Bakes and The Joy of Baking.
It was simple to make and adjust. If you like coconut, add more. If you like pecans, add more. If you like butter, add more. Simple. I would suggest that if you are making cupcakes instead of a full German chocolate cake, that you chop the pecans a little smaller than the recipes recommend.
When the icing was cool, I spread it on.
And then added the German-themed chocolate toppers.
Happy birthday, Tom!
Sunday, October 23, 2011
Native American Art Wedding Cake
When my dad and his sweetheart announced they were getting married, I was thrilled! They both love Native American art, specifically Haida and Tlingit or Northwest coastal art. Instead of having them order any gluten-free cake for my sister and me, I offered to bring a gluten-free cake.
I printed a picture from The Path Gallery's website. The print was called Eagle's Heart' by Wayne Edenshaw.
Using melting chocolate in plastic baggies, I piped the dark chocolate lines first, then the white chocolate ones and then the red ones. The original artwork was much more complex than I could attempt using chocolate, so I had to simplify the design considerably.
The finished product looked better than I hoped. You can see the eagles with their heads together at the top of the heart, and you can make out the chick in between them as well.
Since I wasn't sure what size I wanted to make the chocolate art or what size I wanted the cake to be, I made a small and a medium chocolate replica of the design as well.
I liked all three of the chocolate transfer designs, but I decided to use the largest one on a mini cake, which I baked in a casserole dish, since it was my only appropriately sized container.
I used plain white icing, most of which was covered by the chocolate anyway. I'm still not very talented at making the buttercream smooth, so it's probably for the best that my design didn't allow for much of the icing to show!
For the accompanying cupcakes, I free-handed some hearts and use a mold to create a few instruments (the wedding couple's other shared passion is music). The silicone baking cups worked beautifully! They made the cupcakes into cute flower shapes, but the colors were so autumnal and festive that I served the cupcakes still in the cups.
I liked the smaller chocolate plates so much that I made a cake boards for them and set them out with the mini cake and cupcakes as well. If there's a market for Native American Art replicated in chocolate, I think I've found my niche!
I printed a picture from The Path Gallery's website. The print was called Eagle's Heart' by Wayne Edenshaw.
| Backside of the chocolate transfer |
The finished product looked better than I hoped. You can see the eagles with their heads together at the top of the heart, and you can make out the chick in between them as well.
Since I wasn't sure what size I wanted to make the chocolate art or what size I wanted the cake to be, I made a small and a medium chocolate replica of the design as well.
I liked all three of the chocolate transfer designs, but I decided to use the largest one on a mini cake, which I baked in a casserole dish, since it was my only appropriately sized container.
I used plain white icing, most of which was covered by the chocolate anyway. I'm still not very talented at making the buttercream smooth, so it's probably for the best that my design didn't allow for much of the icing to show!
For the accompanying cupcakes, I free-handed some hearts and use a mold to create a few instruments (the wedding couple's other shared passion is music). The silicone baking cups worked beautifully! They made the cupcakes into cute flower shapes, but the colors were so autumnal and festive that I served the cupcakes still in the cups.
I liked the smaller chocolate plates so much that I made a cake boards for them and set them out with the mini cake and cupcakes as well. If there's a market for Native American Art replicated in chocolate, I think I've found my niche!
Labels:
Cake Decorating,
food,
gluten-free,
Nerdiness
Sunday, October 9, 2011
Bellingham Flat Bread and Bakery: Gluten-free Goods with a Smile!
During my recent trip to visit my fabulous aunt in Bellingham, I had the opportunity to visit Bellingham Flat Bread and Bakery, which was one of the (many) highlights of my weekend.
This corner bakery had the most gluten-free options I've seen in any bakery, excluding the entirely gluten-free shop (Haley's) in Kent. One wall's shelves were stacked with gluten-free breads ranging from simple white bread to rosemary garden bread to pumpkin double chocolate mini loaves. The cookie bins held gluten-free chocolate chip cookies, sugar cookies, macaroons and more. My sister bought a couple of loaves to take home and the generous proprietor gave us each a gluten-free pumpkin chocolate chip cookie to sample.
Delicious!
If the cookies, scones, muffins, cupcakes, breads and cinnamon rolls aren't enough to get you into the bakery immediately, the proprietor also informed us that Bellingham Flat Bread and Bakery is hoping to open an entirely gluten-free venue in the future! So support local business, gluten-free business, and treat yourself to something indulgent!Thursday, July 21, 2011
Offbeat Bride Guest Blogger
I am going to shamelessly promote my own Offbeat Bride blog post, which is now up on their website. No, I am not getting married. I just like weddings. And blogging. The post is about providing gluten-free alternatives to cake at a wedding.
And because no blog post here on What's the Smatter is complete without one, I will now leave you with a gratuitous cute animal photo:
This is Cactus Jack the North American porcupine, just waking from an afternoon nap.
And because no blog post here on What's the Smatter is complete without one, I will now leave you with a gratuitous cute animal photo:
This is Cactus Jack the North American porcupine, just waking from an afternoon nap.
Labels:
Cake Decorating,
food,
gluten-free,
Guest Blogger,
seattle
Tuesday, May 31, 2011
Steelhead Diner: Splurging for Service
Last weekend Jared and I spent some quality time exploring Seattle's Pike Place Market, which neither of us had visited for a few years. Our excursion reminded me of why I love the Market and Seattle. The people-watching opportunities are superb, the artisans are top-notch, and the atmosphere is warm and welcoming, even if the weather isn't.
When our stomachs started to grumble, we headed to the Steelhead Diner, where we planned to enjoy a meal we normally wouldn't have the budget for (hooray for gift cards, and many thanks to Stephanie and Andy!).
We were seated immediately in a booth situated next to a display of neatly labeled fishing lures. A panoramic view of a river dominated one wall and an extreme close-up photograph of salmon roe hung on another.
The menu at this snazzy establishment focuses on fish, as the name would suggest, but I was eager to try a dish from the veggies and legumes selection. While the Steelhead didn't have a special gluten-free menu, our server very kindly pointed out a couple of gluten-free options from the regular menu that looked appetizing.
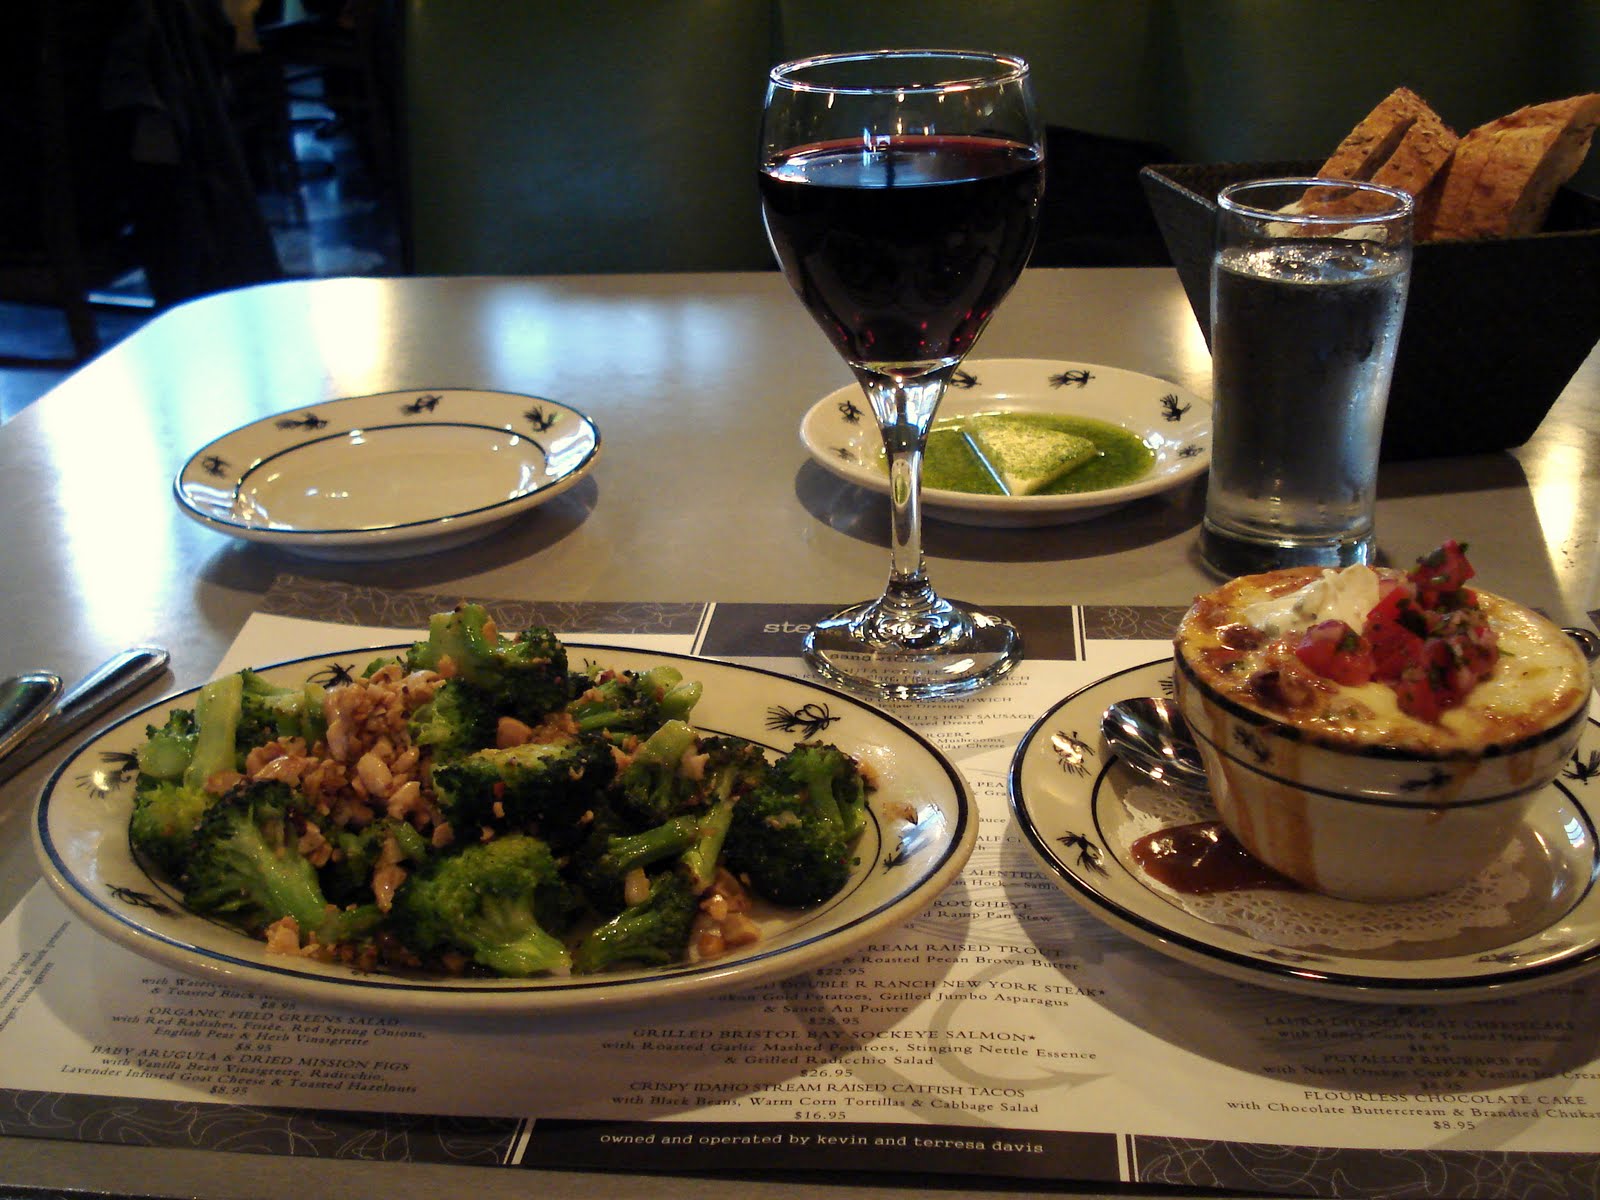
Jared ordered a hard-to-find Scotch ale, which arrived quickly while I pondered the gluten-free options. I ordered a Revelry Merlot to complement a vegetable chili and pan-seared broccoli topped with toasted almonds.
A lightly baked layer of creamy cheese covered the chili, which was packed with veggies like red peppers, tomatoes and even a little eggplant, I think. The broccoli dish was larger than expected, with a generous topping of warm, roasted almonds. Though the broccoli was a little oilier than I would have preferred, I forgave this because of the fresh citrus-flavor that balanced the nuts.
The waitress was attentive and helpful without being pushy or insincere, which is exactly how I like my waitstaff! She apologized for a delay in taking our order, but I will admit I hadn't noticed, since it takes me so long to decide what to order. As an appeasement, my glass of wine was complimentary.
If you're in the Seattle area, searching for some luscious seafood, quick service and a casual atmosphere where the waitstaff are polite enough to know when to leave you alone, try the Steelhead Diner!
When our stomachs started to grumble, we headed to the Steelhead Diner, where we planned to enjoy a meal we normally wouldn't have the budget for (hooray for gift cards, and many thanks to Stephanie and Andy!).
We were seated immediately in a booth situated next to a display of neatly labeled fishing lures. A panoramic view of a river dominated one wall and an extreme close-up photograph of salmon roe hung on another.
The menu at this snazzy establishment focuses on fish, as the name would suggest, but I was eager to try a dish from the veggies and legumes selection. While the Steelhead didn't have a special gluten-free menu, our server very kindly pointed out a couple of gluten-free options from the regular menu that looked appetizing.
Jared ordered a hard-to-find Scotch ale, which arrived quickly while I pondered the gluten-free options. I ordered a Revelry Merlot to complement a vegetable chili and pan-seared broccoli topped with toasted almonds.
A lightly baked layer of creamy cheese covered the chili, which was packed with veggies like red peppers, tomatoes and even a little eggplant, I think. The broccoli dish was larger than expected, with a generous topping of warm, roasted almonds. Though the broccoli was a little oilier than I would have preferred, I forgave this because of the fresh citrus-flavor that balanced the nuts.
The waitress was attentive and helpful without being pushy or insincere, which is exactly how I like my waitstaff! She apologized for a delay in taking our order, but I will admit I hadn't noticed, since it takes me so long to decide what to order. As an appeasement, my glass of wine was complimentary.
If you're in the Seattle area, searching for some luscious seafood, quick service and a casual atmosphere where the waitstaff are polite enough to know when to leave you alone, try the Steelhead Diner!
Subscribe to:
Posts (Atom)